Unleash your inner maker
Welcome to the Craft Projects Showcase, where imagination takes shape! Explore a world of handcrafted wonders, from stunning stained glass to cozy blankets. No matter your skill level, there's something here to inspire your next creation. Join us in celebrating the joy of crafting!

Stained glass creations
Discover the mesmerizing beauty of stained glass. From intricate panels to delicate ornaments, these projects offer a chance to work with light and color in truly captivating ways. Suitable for all skill levels. Sign up for a class to learn the basics!

Holiday themed crafts
Get into the spirit with our delightful holiday crafts! Whether it's spooky Halloween decorations, festive Christmas ornaments, or charming Easter creations, you'll find projects to celebrate every occasion. Explore projects for all skill levels and add a personal touch to your seasonal celebrations.

Crafted by Theme: Creative Ideas for Every Style
Creating a wide variety of crafts allows for endless creativity, from everyday themed projects to special holiday-inspired designs. Themed crafts can reflect favorite interests, seasons, or cozy aesthetics, using colors, textures, and materials that bring each idea to life. Holiday crafts add an extra layer of excitement, incorporating festive symbols, traditions, and décor for celebrations throughout the year, from handmade ornaments to seasonal decorations. Whether crafting for fun, gifting, or decorating, exploring both themed and holiday projects encourages imagination, personal expression, and the joy of making something unique by hand.
January Crafts
NO SEW TIE BLANKET CRAFT
To make a no-sew tie fleece blanket, start by laying two pieces of fleece fabric on top of each other with the wrong sides facing in, smoothing out any wrinkles so the edges line up evenly.
Trim the edges if needed, then cut a square (usually about 4–5 inches) out of each corner.
Next, cut strips along all four sides of the blanket, making each strip about 1 inch wide and the same length as the corner square you removed.
Once all the fringe is cut, take one strip from the top layer and the matching strip from the bottom layer, tie them together in a simple double knot, working your way around the entire blanket.
When finished, gently pull on the ties to even them out, and you’ll have a soft, cozy blanket with no sewing required.
MARSHMELLOW STACKS
How to Make a Marshmallow Stack Wood Craft
Step-by-Step Instructions for a Fun and Creative Project
Introduction
Creating a marshmallow wood craft is an engaging and simple activity that's perfect for kids, families, or anyone looking to explore their creative side. This craft uses easy materials—wood blocks and paint—to build imaginative shapes and structures. Follow the instructions below to make your own marshmallow wood craft.
Materials Needed
- Wood Blocks (square or round edged)
- Paint – white, black, tan or brown, pink colors
- Elmers Glue
- Paint Brushes
Instructions
- Prepare Your Workspace:
- Cover your table with newspaper or a disposable tablecloth to keep things clean. Gather all your materials before you start.
- Plan Your Design:
- Decide what you want to the face to be on the marshmallow—a cute smiley face or a wink face.
- Paint each block with 2 coats of white paint as the base.
- After you have painted each block white, next work on painting the faces on each of your marshmallows with the black paint period to ensure you get fine details, make sure to use a very fine tipped paint brush when you are painting the faces on each of the blocks.
- After you have painted a face on each of your blocks, take your Elmer’s glue and along the top of each block put a very thin layer of glue, letting it run down a little over the edges and down the front to create a cute melting effect.
- Once the Elmers glue has dried with tan or brown color paint lightly go over your glue so that you can give each block a nice and cute little toasty effect.
February Crafts
Easy Pressed Flower Light Jar
Materials:
8 -0z or 16-oz glasses jar or vase
Mod Podge
pressed flowers
brush
tweezers
votive tealight candle or flameless tealight candle
Instructions:
Step 1:
Start by painting a small area of the jar with Mod Podge.
Step 2:
Using tweezers or your hand, gently pick up the pressed flowers and place them onto the area with Mod Podge. Be careful when picking them up as they are fragile.
Step 3:
Add more mod podge, a little bit at a time, then add more pressed flowers and leaves. Do small areas at a time as the Mod Podge dries quickly. If your leaves or flowers have stem, they may not lay down properly. You can just place a little flower over it to keep it in place.
Step 4:
Once you are done, gently go over each one with Mod Podge to seal them onto the jar. Set aside and let it dry.
Step 5:
Add the candle inside the jar.


How to Make Pocket Hugs
Pocket hugs are small handmade keepsakes designed to be carried in a pocket, purse, or backpack as a comforting reminder of love and support. They’re quick to make, inexpensive, and perfect for gifting.
Supplies Needed:
Felt, fabric scraps, or cardstock
Scissors
Hot glue or craft glue (or needle and thread if sewing)
Permanent marker or paint pen
Optional: ribbon, buttons, yarn, googly eyes, or tiny charms
Instructions:
Cut out a small heart from card stock or use a pre-cut foam heart. Aim for about 2–3 inches so it fits comfortably in a pocket.
Assemble (if using felt, fabric or scrap book paper) Cut two matching shapes. Glue or stitch them together.
Finish with extras, attach ribbon arms, yarn, or tiny embellishments to give your pocket hug personality.
Add a note (optional)
Pair your pocket hug with a small card explaining its meaning, such as:
“Whenever you need a hug, keep this close.”
March Crafts
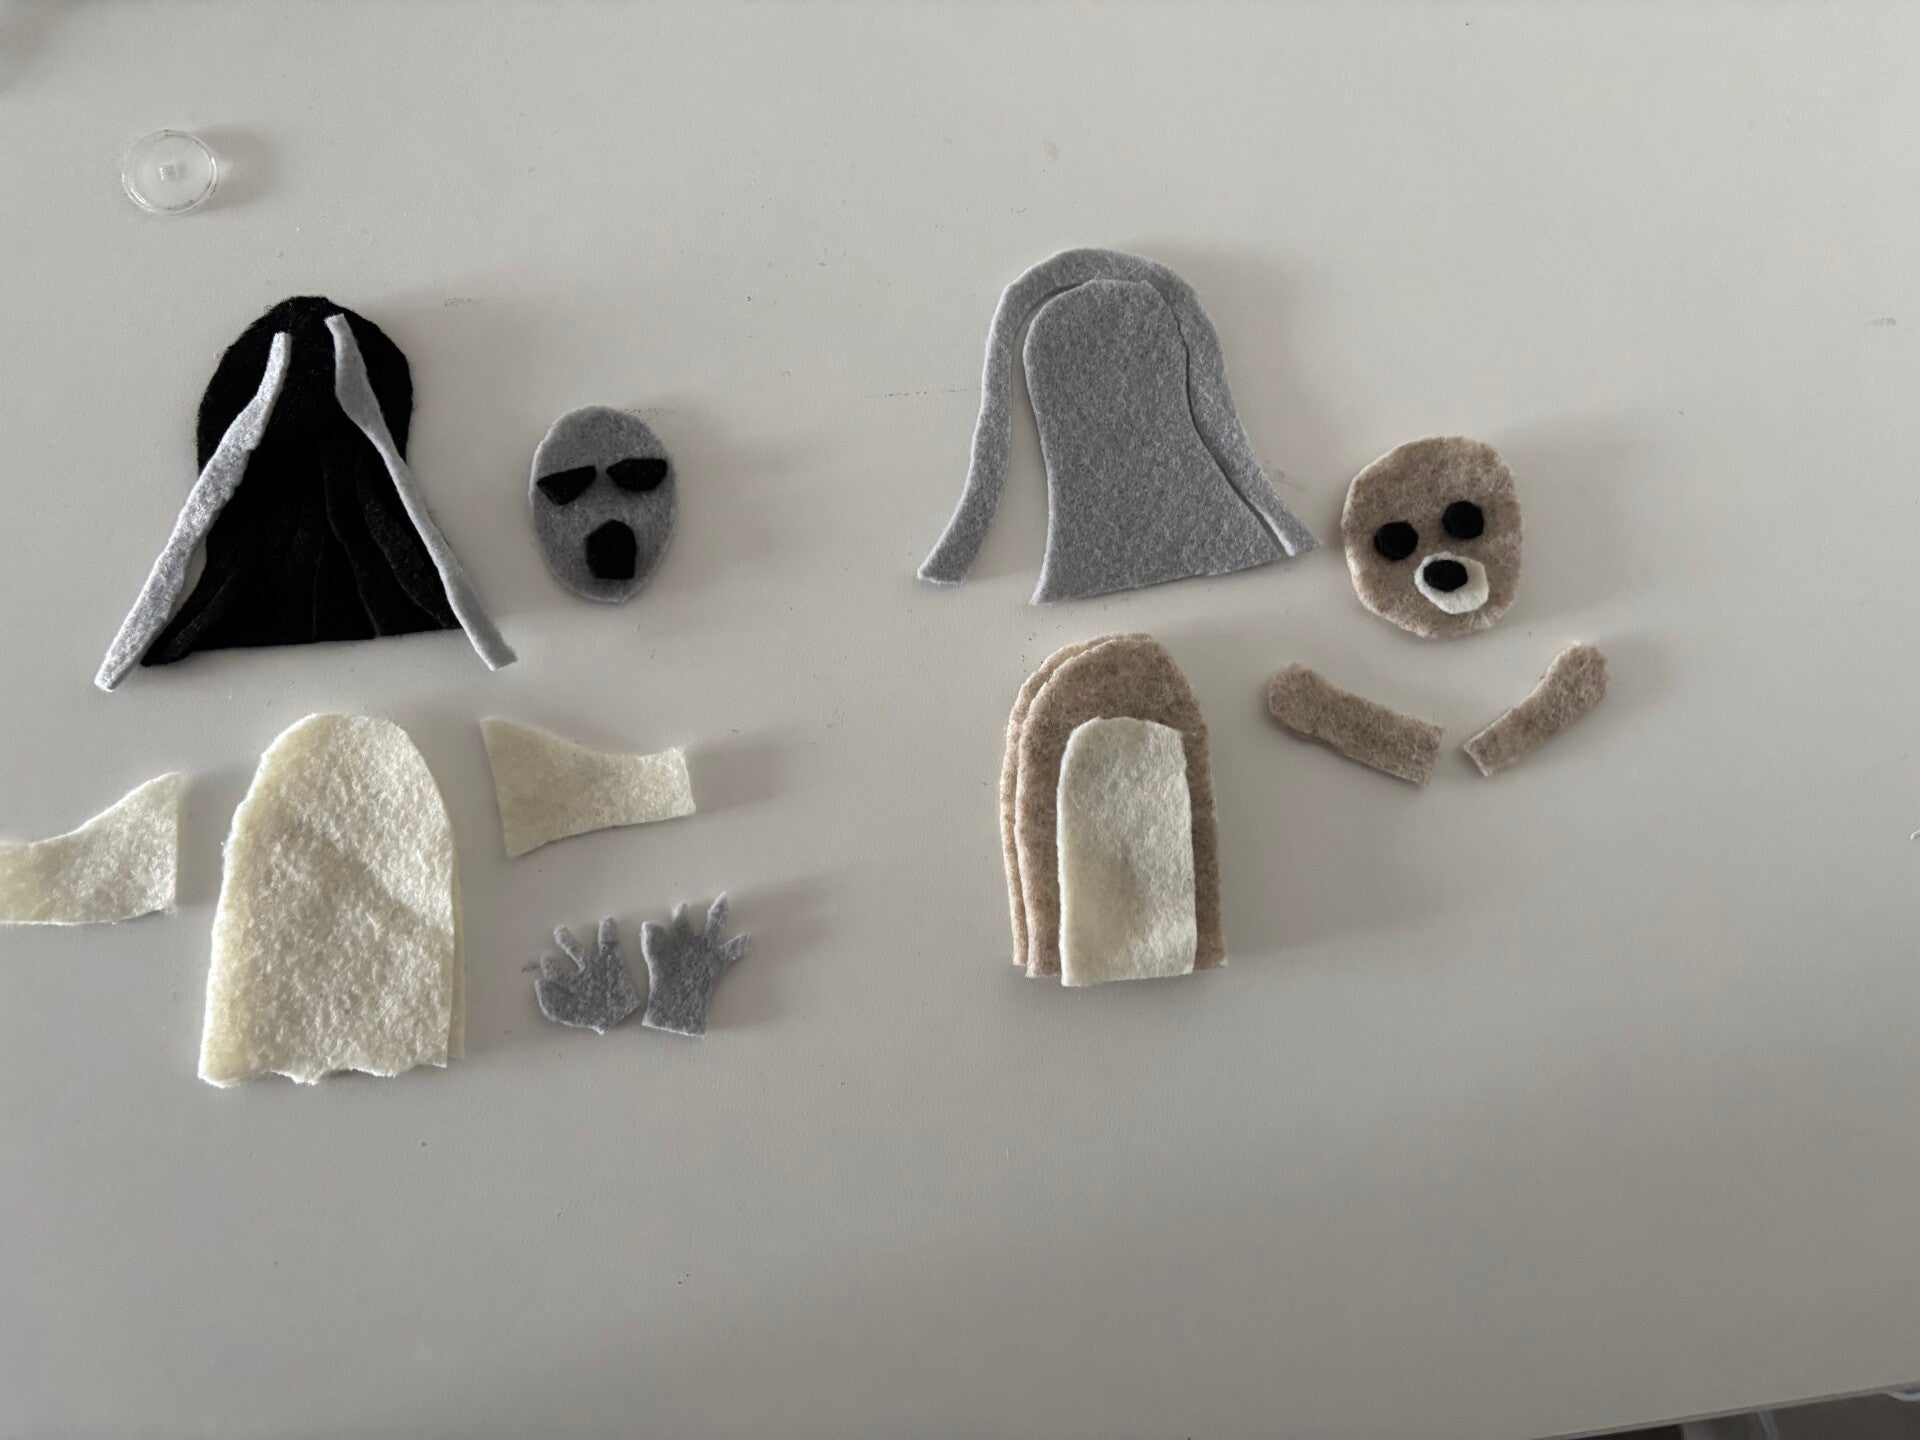
Banshee and Selkie Finger Puppets
Materials:
Black Felt
Grey Felt
White Felt
Beige Felt
Black Sharpie
Glue Gun Scissors
Banshee Puppet:
For the banshee puppet, start by cutting out the shape of the body with the white felt using 2 pieces. Next with the white felt cut out the arms into small shapes. Next take the grey felt and cut out an Oval shape for the head and then using the same grey felt cut out two small hands. Next for the face take the black felt and cut out Crescent shaped eyes and an Oval shaped mouth. Next for the hair take the black and Gray felt and cut out a black piece of felt shaped in a WAVY cut out along with some strips of Gray felt also cut into WAVY strips. Then with the glue gun glue the two pieces of the bodice together, then attach the two small arm pieces that were cut from the white felt to the back of the bodice, then glue a hand on the end of each sleeve. Then glue the face that was cut from the Gray Oval shaped onto the bodice then glue each eye and mouth onto the face piece, then when the face has been attached to the bodice glue the hair onto the backside of the face piece and then on the front side of the face piece glue the additional WAVY Gray strips and black strips of felt to create the hair for the banshee.
Selkie Puppet
For the selkie puppet, start by cutting out the shape of the body using two pieces of the beige felt. Next with the beige belt also cut out to arms. Then with the white felt cut out the body layer for the body of the selkie, Then also using the beige felt cut out a circular shape for the head. Next with the black felt cut out two small circles for the eyes and a medium sized circle or oblong shape for the nose, then also cut out of small oblong circle shape for the face out of the white felt. And then lastly for the hair cut out a WAVY shape out of the grey felt for the hair and then cut out two weigh these strips out of the grey felt for the hair. Lastly once you have all of the pieces cut start by gluing together the two pieces of the body and then also gluing the arms on and making sure to glue the white center body piece onto the main piece of the beige body felt cut out. Once you have the body together the next step is to glue the head onto the body and then follow by gluing hi the mouthpiece and nose onto the head of the body. Once you have the head and face glued together the last step is to attach the hair glue the big piece to the back of the head and then with the strips that were cut glue those onto the front of the face so that it gives a layered look.


APRIL CRAFTS
EASTER EGG CAT TOYS
What you need:
Easter eggs (After Easter there are big sales on these and you can find them for pennies each or perhaps you already have some stashed away)
Jingle bells
Hot glue (optional but recommended)

BRAIDED ROPE DIY DOG TOY
Using fleece fabric you can make easy braided-rope dog pull toys.
Here are the instructions:
- First cut your fleece into strips.
- Secure one end with a safety pin, knot, or rubber band.
- Next securely hold the end while you braid the toy tightly.
- Cut a fringe on both ends or leave it as-is.
- Give as gifts or keep for your dog.
May Craft
Star Wars Phone Pooch
Materials:
Felt or Fur (white, Blue, Brown, Orange, White, Grey)
Thread or Glue Gun
Instructions:
Take a piece of white or brown felt or brown fur folded in half and trim edges to fit the length of your phone. Next with either brown or white colored thread or a glue gun either stitch along the side and top seams of the felt or use a glue gun to seal the top and side seams. For the Chewy Pooch Cut a diagonal quarter inch strip of orange felt and white felt, then with the white felt piece cut into 6 to 8 rectangular pieces then cut those rectangular pieces in half to create small white squares then attach the small white squares evenly spaced across the diagonal orange strip belt and then glue with the hot glue gun the belt to the face of the either brown felt pouch or brown fur pouch. For the R2D2 style phone pouch take the blue felt and cut out the pieces to match the characters of his body such as small blue squares and blue strips of felt as well as a blue circle, also cut out a half circle moon shaped out of the Gray felt for the headpiece and then also with the Gray felt cut a thin quarter inch size strip for the base of the body. Once you have all of the felt shapes cut out for the body place them on the white base according to how you would like your R2D2 to look like, then take the glue and glue gun and glue each piece into place.


June Craft
Cryptid Pet in a Jar
To make an air clay cryptid figure, first gather your air-dry clay and a flat surface to work on. Next, roll the clay into basic shapes like balls, cylinders, or cones for the body, head, arms, and legs. Attach the pieces by gently pressing them together and smoothing the seams with your fingers. Then, add details such as eyes, ears, claws, horns, wings, or fur, depending on the cryptid you are making. Use a toothpick or clay tool to carve in textures like scales, feathers, or fur. Once your figure is finished, place it in a safe spot and let it air dry completely, following the drying time on the clay package. After it has dried, you can paint your cryptid with acrylic paint and let the paint dry before displaying your finished creation.

